LED
display driver
Task: The main purpose of this
exercise is to design a module that controls the four digits of the LED display
(for use in other exercises).
To test the operation of this module, it should be embedded in a system
that allows you to set (using buttons and switches) and display any 4-digit
hexadecimal number with dots on the LED display.
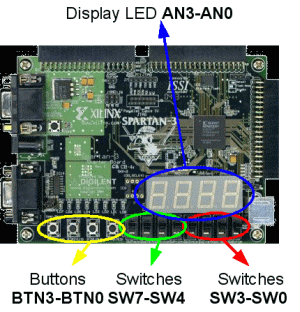
Fig. 1.
Photograph of the Digilent Spartan 3 board.
The basic display control module should have the following interface
(this module will be used in next exercises):
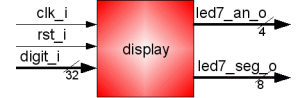
Fig. 2.
Interface of the display control module.
Ports’ usage:
- clk_i – input of
the 50 MHz clock signal.
- rst_i – input of
the asynchronous reset signal (active with logic ‘1’). When this signal is
asserted all segments of the display should be lit.
- digit_i – 32-bit
input, each bit corresponds to the single segment of the display (8 most
significant bits refer to the segments of the AN3 digit, etc.).
- led7_an_o – 4-bit
output driving anodes of the digits of the display (determines which digit
is lit).
- led7_seg_o – 8-bit
output driving segments of all the digits of the display (determines which
segments are lit).
The display consists of four 7-segment LED digits. The corresponding
segments of each digit are connected together, so multiplexing must be applied.
To light a segment you must drive logic '0' both to the digit (ANx) and
for the segment (A-G or DP) signals. The recommended multiplexing frequency is
1 kHz. The system clock (50 MHz) division coefficient, which results in a
multiplexing frequency (1 kHz), should be a parameter that can be easily
changed in the display module.
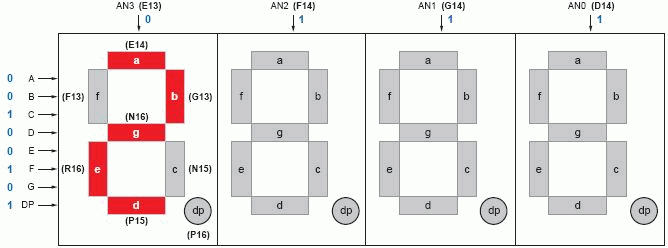
Fig. 3. Connections of segments
and digits of LED display. Example of displaying digit '2'.
Next, design the second component containing the encoder and the display
memory. It is used to test the display module and should provide the following:
1.
Switches: SW3, SW2, SW1, SW0 are used to set
a 4-bit value.
2.
Pressing the BTN3 button should display on the AN3 digit
the value currently set on the switches SW3-SW0. The value should be
displayed in hexadecimal. The same action should be assigned to the other
buttons, ie: pressing BTN2 controls the AN2 digit, BTN1
controls the AN1 digit and BTN0 controls the AN0 digit.
When you press the button, the sign on the digit should be visible permanently
until you enter a new value.
3.
Switching SW7 on should light decimal dot (DP) of the digit AN3.
Switching the switch off should cause the DP of this digit to go off. The same
applies to SW6 and DP of the AN2 digit, SW5 and DP of the AN1
digit and SW4 and DP of the AN0 digit. This function should be
independent of the state of the BTNx buttons.
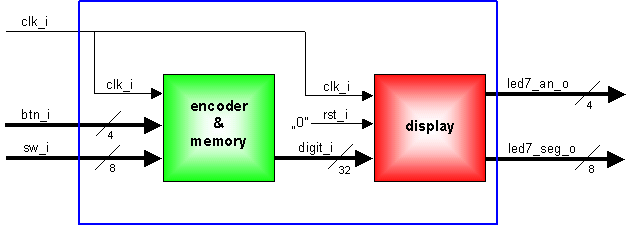
Fig. 4. Schematic diagram of the complete system (blue rectangle shows
the top level module).
Write a testbench. If it is necessary for simulation purposes, you can
add a reset input port to the top level module. Before implementation, execute
the simulation using the testbench file.
UCF file for the exercise, Digilent
Spartan-3 board, Spartan-3 3S200 FT256-4:
#######################################################################
# Clock:
NET "clk_i" LOC = "T9" ; # 50 MHz clock
#######################################################################
#######################################################################
# Seven-segment LED display:
NET "led7_an_o<3>" LOC = "E13" ; # leftmost digit,
active low
NET "led7_an_o<2>" LOC = "F14" ; # active low
NET "led7_an_o<1>" LOC = "G14" ; # active low
NET "led7_an_o<0>" LOC = "D14" ; # rightmost digit,
active low
#
NET "led7_seg_o<7>" LOC = "E14" ; # segment 'a',
active low
NET "led7_seg_o<6>" LOC = "G13" ; # segment 'b',
active low
NET "led7_seg_o<5>" LOC = "N15" ; # segment 'c',
active low
NET "led7_seg_o<4>" LOC = "P15" ; # segment 'd',
active low
NET "led7_seg_o<3>" LOC = "R16" ; # segment 'e',
active low
NET "led7_seg_o<2>" LOC = "F13" ; # segment 'f',
active low
NET "led7_seg_o<1>" LOC = "N16" ; # segment 'g',
active low
NET "led7_seg_o<0>" LOC = "P16" ; # segment 'dp',
active low
######################################################################
######################################################################
# Slide switches:
# sw7 sw6 sw5 sw4 sw3 sw2 sw1 sw0
NET "sw_i<0>" LOC = "F12" ; # active high when in UP
position
NET "sw_i<1>" LOC = "G12" ; # active high when in UP
position
NET "sw_i<2>" LOC = "H14" ; # active high when in UP
position
NET "sw_i<3>" LOC = "H13" ; # active high when in UP
position
NET "sw_i<4>" LOC = "J14" ; # active high when in UP
position
NET "sw_i<5>" LOC = "J13" ; # active high when in UP
position
NET "sw_i<6>" LOC = "K14" ; # active high when in UP
position
NET "sw_i<7>" LOC = "K13" ; # active high when in UP
position
#######################################################################
#######################################################################
# Push-buttons:
# @ @ @ @
# btn3 btn2 btn1 btn0
NET "btn_i<0>" LOC = "M13" ; # active high
NET "btn_i<1>" LOC = "M14" ; # active high
NET "btn_i<2>" LOC = "L13" ; # active high
NET "btn_i<3>" LOC = "L14" ; # active high
#######################################################################