RS-232
port monitor
Task:
Design the RS232 data monitor module operating with the following
transmission parameters: 9600bps, 8 data bits, 1 stop bit, no parity bit,
without flow control. Connect the display module from the previous exercise so
that the RS232 receiver presents the data on the LED display in hexadecimal
notation (using 2 hex digits). Choose any 2 consecutive digits on the LED
display, other digits should be disabled.
Ports’ usage:
- clk_i – 50 MHz
clock input,
- rst_i –
asynchronous reset input,
- RXD_i – RS232 data
input,
- led7_an_o – anode
output to the LED display,
- led7_seg_o – segment
output to the LED display.
Perform a functional simulation and verify the circuit practically by
programming the prototype board. To perform a practical verification connect
the cable of the COM1 port of the PC to the prototype board and run the MINICOM
program (the program is configured by default to 9600bps, 8 data bits, 1 stop
bit, no parity).
Pressing the key on the PC keyboard should display its code on the LED
display.
Transmission and reception of
data in the RS232 standard:
Transmission and reception of data in the RS232 standard is done in a
serial manner, separately on two data lines (one data line for direction to the
device and one data line for direction from the device). When no transmission
is present, the signal on the line is high (logic level ‘1’). The start of the
transmission is initiated by the falling edge of the input signal followed by
the so-called ‘start bit’ (logic level ‘0’), which should last for a period
equal to the reciprocal of the baud rate, in our case 1/9600 [seconds]. All
subsequent bits are sent with the same timing. The data is transmitted in
series starting from the least significant bit (D0) up to the most significant
bit (D7). Later there is a parity bit, which is a result of a logical XOR
operation on D0-D7 data. The parity bit is optional and does not occur in the
case of this exercise. The termination of the transmission is signaled by the
stop bit (logic level ‘1’).
The sample transmission of the code:
01010011 is presented below:
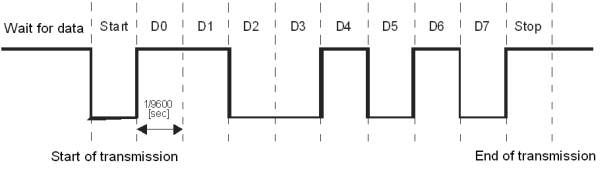
Fig. 1. Sample
transmission of the code: 01010011 using the RS-232 (9600 bps, 8-bits, 1-stop,
no parity).
Additional information about RS232 standard:
http://en.wikipedia.org/wiki/RS-232
UCF file for the exercise, Digilent
Spartan-3 board, Spartan-3 3S200 FT256-4:
# Clock:
NET "clk_i" LOC = "T9" ; # 50 MHz clock
# Push-buttons:
NET "rst_i" LOC = "L14" ; # pressed high BTN3
# RS232:
NET "RXD_i" LOC = "T13" ; # RS 232 RXD
# Seven-segment LED display:
NET "led7_an_o<3>" LOC = "E13" ; # leftmost digit,
active low
NET "led7_an_o<2>" LOC = "F14" ; # active low
NET "led7_an_o<1>" LOC = "G14" ; # active low
NET "led7_an_o<0>" LOC = "D14" ; # rightmost digit,
active low
#
NET "led7_seg_o<7>" LOC = "E14" ; # segment 'a',
active low
NET "led7_seg_o<6>" LOC = "G13" ; # segment 'b',
active low
NET "led7_seg_o<5>" LOC = "N15" ; # segment 'c',
active low
NET "led7_seg_o<4>" LOC = "P15" ; # segment 'd',
active low
NET "led7_seg_o<3>" LOC = "R16" ; # segment 'e',
active low
NET "led7_seg_o<2>" LOC = "F13" ; # segment 'f',
active low
NET "led7_seg_o<1>" LOC = "N16" ; # segment 'g',
active low
NET "led7_seg_o<0>" LOC = "P16" ; # segment 'dp',
active low
#